Some time ago I heard about a project called OroCRM. The fact that one of the original Magento creators Yoav Kutner is involved and that it’s based on very popular Symfony2 framework made me follow it’s progress.

Since I didn’t have much spare time at that period I was unable to dive deeper into OroCRM. At Meet Magento Switzerland Conference one of the Symfony project community leaders Lukas Kahwe Smith had a talk where he introduced everyone to OroCRM which made me want to get involved even more. So finally in last couple of weekends I dedicated some time for this and I wanted to share what I found out with you.
OroCRM is a CRM application that is based on Oro Platform, a general purpose Business Application Platform. Oro Platform provides many features that make creating a business application easier. Some of these are data grids, ACL role management and out of the box support for REST and SOAP. Another important thing to consider is that the entire project is based on, in my opinion, currently leading PHP framework Symfony2.
A Simple CRUD
I remember when I started with Magento my first task was to create a simple CRUD. That means a small application that has the functionality to Create, Read, Update and Delete some records. I think it’s a good exercise when starting with some new framework. So the aim of this article is to create a simple CRUD bundle within the OroCRM application. Bundle is actually a concept that is very similar to plugin which is a self contained piece of code that is meant to be used across projects.
I won’t cover the installation, in my case the process explained on the Github repository worked just fine. I would also like to mention that many of the things mentioned here are also covered in the official documentation, so you may want to take a look there too. The entire code from this article is available on my Github account.
Creating the bundle
Symfony2 has a nice console component which makes a repetitive task of creating all necessary files for the bundle easy by using a shell command. In our case the command is:
php app/console generate:bundle --namespace=Dusan/Bundle/SimpleBundle
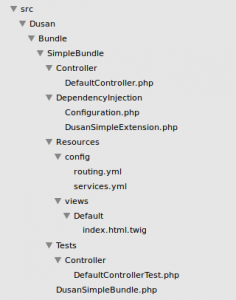
After running this command we should choose all the default options, only for preffered configuration format we should choose yml. Once it finishes we will be able see that some files are created in the src directory.

Controller and routes
Among other things, the console command created a controller with a simple action for us.
src/Dusan/Bundle/SimpleBundle/Controller/DefaultController.php
<?php

namespace Dusan\Bundle\SimpleBundle\Controller;

use Symfony\Bundle\FrameworkBundle\Controller\Controller;

class DefaultController extends Controller
{
    public function indexAction($name)
    {
       return $this->render('DusanSimpleBundle:Default:index.html.twig', array('name' => $name));
    }
}
Let’s change this a bit since OroCRM uses annotations for controllers. We will just define that “/index” route should match this action and give a name to our action which will be used for referencing later.
src/Dusan/Bundle/SimpleBundle/Controller/DefaultController.php
<?php

namespace Dusan\Bundle\SimpleBundle\Controller;

use Symfony\Bundle\FrameworkBundle\Controller\Controller;
use Sensio\Bundle\FrameworkExtraBundle\Configuration\Route;
use Sensio\Bundle\FrameworkExtraBundle\Configuration\Template;
use Symfony\Component\HttpFoundation\Response;

class DefaultController extends Controller
{
    /**
    * @Route("/index", name="dusan_simple_index")
    */
    public function indexAction()
    {
      return new Response('Hello world');
    }
}
There is another important file that was created with our console command and that is our bundle’s routing file. It informs the system about our controller. Let’s change it so it looks like this:
src/Dusan/Bundle/SimpleBundle/Resources/config/oro/routing.yml
dusan_simple_index:
    resource:     "@DusanSimpleBundle/Controller/DefaultController.php"
    type:         annotation
    prefix:       /dusan
By now we should check if everything is working by navigating to {PROJECT_BASE_URL}/app_dev.php/dusan/index. If we did everything correctly we should see the “Hello world” message.
This process is also described in the official documentation.
Adding bundle to the main navigation menu
In order to have our own link in the main navigation menu we need to create a navigation.yml file:
src/Dusan/Bundle/SimpleBundle/Resources/config/navigation.yml
oro_menu_config:
    items:
       dusan_tab:
           label: Dusan
           uri:   '#'
           extras:
               position: 300
       dusan_tab_link:
           label: Dusan Simple Crud
           route: dusan_simple_index
           extras:
               routes: ['/^dusan_simple_index/']
               description: Dusan Simple Crud Link
    tree:
       application_menu:
           children:
               dusan_tab:
                   children:
                       dusan_tab_link: ~
oro_titles:
    dusan_simple_index: Dusan Simple Crud
This is also covered in the official documentation on this page.
After that we need to build our navigation from the console and clear cache with this command:
php app/console cache:clear
Once we complete these few steps we should see our button added to the main navigation menu:

When we click on the button our “Hello world” message should appear
Listing all the records
Let’s turn the index action from our controller into something meaningful. We could list all of the existing records for start.
Doctrine Entity
The first thing that we need to do is to define our entity. Symfony2 uses Doctrine ORM for persisting and reading data. Our Doctrine entity will be a simple class whose sole purpose is to hold data. Since this is a simple example, we will only have three fields, firstname, lastname and email. To make this easier there is a doctrine console command which can create an entity for us:
php app/console doctrine:generate:entity --entity="DusanSimpleBundle:SimpleCrud" --fields="firstname:string lastname:string email:string"
This will create our Entity class with properties and their getters and setters:
src/Dusan/Bundle/SimpleBundle/Entity/SimpleCrud.php
<?php

namespace Dusan\Bundle\SimpleBundle\Entity;

use Doctrine\ORM\Mapping as ORM;

/**
 * SimpleCrud
 *
 * @ORM\Table()
 * @ORM\Entity
 */
class SimpleCrud
{
    /* properties, getters, setters */
}
We should use another command in order to update our database with these changes (creates new table in this case). But before that let’s change our table name so it conforms to OroCRM standards. If you look at line 10 of our entity class it says:
* @ORM\Table()
If we would leave it like that, it would create a table named “SimpleCrud”. We can see that in our database all tables have lowercase name with underscores, therefore we should change this to:
* @ORM\Table(name=”simple_crud”)
After this change, we can run the schema update command.
php app/console doctrine:schema:update --force
Since later we will need to use this entity in our data grid definition we need define it as a parameter in our services.yml file:
src/Dusan/Bundle/SimpleBundle/Resources/config/services.yml
parameters:
    dusan_simple.simple_crud.entity.class: Dusan\Bundle\SimpleBundle\Entity\SimpleCrud
Data grid
Our records should appear in data grid. In order to create a data grid we need to define it first:
src/Dusan/Bundle/SimpleBundle/Resources/config/datagrid.yml
datagrid:
    dusan-simple-grid:
        source:
            type: orm
            query:
                select:
                    - simple_crud.id
                    - simple_crud.firstname
                    - simple_crud.lastname
                    - simple_crud.email
                from:
                    - { table: %dusan_simple.simple_crud.entity.class%, alias: simple_crud }
        columns:
            id:
                label: dusan_simple.simple_crud.id.label
            firstname:
                label: dusan_simple.simple_crud.firstname.label
            lastname:
                label: dusan_simple.simple_crud.lastname.label
            email:
                label: dusan_simple.simple_crud.email.label
        properties:
            id: ~
            update_link:
                type:       url
                route:      dusan_simple_update
                params:     [ id ]
            delete_link:
                type:       url
                route:      dusan_simple_delete
                params:     [ id ]
        actions:
            update:
                type:          navigate
                label:         oro.grid.action.update
                icon:          edit
                link:          update_link
            delete:
                type:          navigate
                label:         oro.grid.action.delete
                icon:          trash
                link:          delete_link
As you can see some routes for the actions that we will use are defined here as well as the fields that should appear in our grid. We only use a minimal number of data grid features in order to keep the article simple. Data grids can actually do much more.
In this case, there is no need to to return anything specific from the controller, so we will just remove “Hello world” from our action and add @Template annotation so that the template that we will create will be rendered.
Let’s also declare the other actions that we will need so we can reference them in index template and data grid.
src/Dusan/Bundle/SimpleBundle/Controller/DefaultController.php
<?php

namespace Dusan\Bundle\SimpleBundle\Controller;

use Symfony\Bundle\FrameworkBundle\Controller\Controller;
use Sensio\Bundle\FrameworkExtraBundle\Configuration\Route;
use Sensio\Bundle\FrameworkExtraBundle\Configuration\Template;
use Dusan\Bundle\SimpleBundle\Entity\SimpleCrud;
use Symfony\Component\HttpFoundation\Response;

class DefaultController extends Controller
{
    /**
    * @Route("/index", name="dusan_simple_index")
    * @Template
    */
    public function indexAction()
    {
      return array();
    }

    /**
    * @Route("/create", name="dusan_simple_create")
    * @Template("DusanSimpleBundle:Default:update.html.twig")
    */
    public function createAction()
    {

    }

    /**
    * @Route("/update/{id}", name="dusan_simple_update", requirements={"id"="\d+"})
    * @Template
    */
    public function updateAction(SimpleCrud $entity)
    {

    }

    /**
    * @Route("/delete/{id}", name="dusan_simple_delete", requirements={"id"="\d+"})
    * @Template
    */
    public function deleteAction($id)
    {

    }
}
Template
Symfony2 uses Twig as its default templating engine and so does Oro CRM. Twig templates can use inheritance which means that one template can inherit from another and override template parts from its parent. Oro CRM uses this feature a lot so our index template can inherit from OroUIBundle template. We also need to import a data grid macro in order to have the required data grid functionality.
src/Dusan/Bundle/SimpleBundle/Resources/views/Default/index.html.twig
{% extends 'OroUIBundle:actions:index.html.twig' %}
{% import 'OroDataGridBundle::macros.html.twig' as dataGrid %}
{% set pageTitle = 'dusan_simple.simple_crud.entity_plural_label'|trans %}
{% set gridName = 'dusan-simple-grid' %}
Translations
At the end, let’s just add some translations so that we have labels for our bundle. We can do so by creating a yaml translations file:
src/Dusan/Bundle/SimpleBundle/Resources/translations/messages.en.yml
dusan_simple:
    simple_crud:
        id.label:              Id
        firstname.label:         Subject
        lastname.label:    "Phone number"
        email.label:           Owner
        entity_plural_label:   "Simple Crud"
        new: New
Wrap up
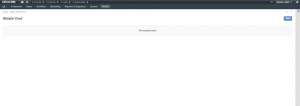
At the end, when navigating to our page we should see something like this:

At this point we have some basic functionality. We still need to create our update, create and delete actions and these will be covered in the second part since this article is already way too long. Let me know if you enjoyed it or have an idea for how to improve it.
Would you like to recommend this article to your friends or colleagues?
Feel free to share.
Article "OroCRM – Creating a simple CRUD (part 1)" has 4 responses
Great article, looking forward for next ones :)
Bravo, Dušane, i hvala ti na trudu!
Hvala, nema na cemu :)
I have any question: all the implementation is only in yml??
what about php files?